A frame from the two billion frames per second camera

Filming At The Speed Of Light, About One Foot Per Nanosecond

[Brian Haidet] published on his AlphaPhoenix channel a laser beam recorded at 2 billion frames per second. Well, sort of. The catch? It’s only a one pixel by one pixel video, but he repeats it over and over to build up the full rendering. It’s a fascinating experiment and a delightful result.

For this project [Brian] went back to the drawing board and rebuilt his entire apparatus from scratch. You see in December last year he had already made a video camera that ran at 1,000,000,000 fps. This time around, in order to hit 2,000,000,000 fps at significantly improved resolution, [Brian] updated the motors, the hardware, the oscilloscope, the signalling, the recording software, and the processing software. Basically, everything.

One of the coolest effects to come out of this new setup is how light appears to travel noticeably faster when coming towards the camera than when moving away from it. It’s an artifact of the setup: laser beams that reflect off of fog particles closer to the camera arrive sooner than ones that bounce back from further away. Or, put another way, it’s special relativity visualized in an experiment in [Brian]’s garage. Pretty cool.

If you found all this intriguing and would like to know more, there’s some bonus material that goes into much more depth.

An array of tiny parallel green lines appears over a steel surface. The white dot a laser beam is visible in the lower center of the picture.

A New Way To Make (Almost) Holograms With Lasers

The spectrum of laser technologies available to hackers has gradually widened from basic gas lasers through CO2 tubes, diode lasers, and now fiber lasers. One of the newer entries is the MOPA laser, which combines a laser diode with a fiber-based light amplifier. The diode’s pulse length and repetition rate are easy to control, while the fiber amplifier gives it enough power to do interesting things – including, as [Ben Krasnow] found, etch hologram-like diffraction gratings onto stainless steel.

Stainless steel works because it forms a thin oxide layer when heated, with a thickness determined by the temperature it reaches. The oxide layer creates thin-film interference with incoming light, letting the laser mark parts of a steel sheet with different colors by varying the intensity of heating. [Ben] wrote a script to etch color images onto steel using this method, and noticed in one experiment that one area seemed to produce diffraction patterns. More experimentation revealed that the laser could consistently make diffraction gratings out of parallel patterns of oxide lines. Surprisingly, the oxide layer seemed to grow mostly down into the metal, instead of up from the surface.

The pitch of the grating is perpendicular to the direction of the etched lines, and varying the line spacing changes the angle of diffraction, which should in theory be enough control to print a hologram with the laser. [Ben]’s first experiment in this general direction was to create a script that turned black-and-white photographs into shimmering matrices of diffraction-grating pixels, in which each pixel’s grating orientation was determined by its brightness. To add a parallax depth effect, [Ben] spread out images into a gradient in a diffraction grating, so that it produced different images at different angles. The images were somewhat limited by the minimum size required for the grating pixels, but the effect was quite noticeable.

Unfortunately, since the oxide layers grow down into the metal, [Ben] doubts whether the laser can etch molds for diffraction-grating chocolate. If you’re interested in more diffraction optics, check out these custom diffraction lenses or the workings of normal holograms.

Sending TOSLINK Wirelessly With Lasers

TOSLINK was developed in the early 1980s as a simple interface for sending digital audio over fiber optic cables, and  despite its age, is still featured on plenty of modern home entertainment devices. As demonstrated by [DIY Perks], this old tech can even be taught some new tricks — namely, transmitting surround sound wirelessly.

Often, a TOSLINK stream is transmitted with a simple LED. [DIY Perks] realized that the TOSLINK signal could instead be used to modulate a cheap red laser diode. This would allow the audio signal to be sent wirelessly through the open air for quite some distance, assuming you could accurately aim it at a TOSLINK receiver. The first test was successful, with the aid of a nifty trick, [DIY Perks] filled the open TOSLINK port with a translucent plastic diffuser to make a larger target to aim at.

The rest of the video demonstrates how this technique can be used for surround sound transmission without cables. [DIY Perks] whipped up a series of 3D printed ceiling mirror mounts that could tidily bounce laser light for each surround channel to each individual satellite speaker.

It’s a very innovative way to do surround sound. It’s not a complete solution to wiring issues—you still need a way to power each speaker. Ultimately, though, it’s a super cool way to run your home theater setup that will surely be a talking point when your guests notice the laser mirrors on the ceiling.

We’ve seen some other stealthy surround sound setups before, too.

Continue reading “Sending TOSLINK Wirelessly With Lasers”

A violet laser beam is shown expanding outward from a diode in a darkened room and illuminating the back of a man's hand.

Driving A Laser At 200 Volts For Nanoseconds

If there’s one lesson to be learned from [Aled Cuda]’s pulsed laser driver, it’s that you can treat the current limits on electronic components as a suggestion if the current duration is measured in nanoseconds.

The components in question are a laser diode and an NPN transistor, the latter of which operates in avalanche mode to drive nanosecond-range pulses of high current through the former. A buck-boost converter brings a 12 volt power supply up to 200 volts, which then passes through a diode and into the avalanche transistor, which is triggered by an external pulse generator. On the other side of the transistor is a pulse-shaping network of resistors and capacitors, the laser diode, and a parallel array of low-value resistors, which provide a current monitor by measuring the voltage across them. There is an optoisolator to protect the pulse generator from the 200 volt lines on the circuit board, but for simplicity’s sake it was omitted from this iteration; there is some slight irony in designing your own laser driver for the sake of the budget, then controlling it with “a pulse generator we don’t mind blowing up.” We can only assume that [Aled] was confident in his work.

The video below details the assembly of the circuit board, which features some interesting details, such as the use of a transparent solder mask which makes the circuit layout clear while still helping to align components during reflow. The circuit did eventually drive the diode without destroying anything, even though the pulses were probably 30 to 40 watts. A pulse frequency of 360 hertz gave a nice visual beating effect due to small mismatches between the pulse frequency of the driver and the frame rate of the camera.

This isn’t the first laser driver to use avalanche breakdown for short, high-power pulses, but it’s always good to see new implementations. If you’re interested in further high-speed electronics, we’ve covered them in more detail before.

Continue reading “Driving A Laser At 200 Volts For Nanoseconds”

Fire Extinguishers, Optical Density Ratings And Safely Using Home Lasers

Ski goggle type laser safety lenses may look dorky, but they leave no gaps and fit around glasses. (Credit: FauxHammer, YouTube)

After [Ross] from FauxHammer miniature model fame got lured into reviewing laser engravers and similar via the Bambu Lab H2D’s laser module, he found himself getting slightly nervous about the whole ‘safety’ aspect of these lasers. After all, lasers can not only light stuff on fire, but it’s a well-known fact that even reflected laser light can be sufficient to cause permanent damage to your retinas. Or worse.

Since your eyes generally do not regenerate, it makes sense to get caught up on laser safety before turning on one of those plentiful-and-increasingly-affordable home laser systems for engraving and/or cutting.

While the issue of stuff catching on fire is readily solved by having a good CO2 extinguisher – and plan B options – at the ready, for safety glasses it’s significantly more complex. There’s not just the issue of finding glasses that block the wavelength of the laser system that you are using, but also with the right optical density (OD) rating. Every mm of the safety lens material can attenuate a certain amount of laser light at the given wavelength, so the OD rating of your laser safety goggles need to match the laser’s power output level, or you might be living with a false sense of security.

Finally, there is the issue of the smoke and fumes produced by these lasers as they obliterate the target material. Much of what is in this smoke you do not want to breathe in, even ignoring long-term dust and VOC exposure issues, so having a solid fume extraction setup and PPE as necessary are absolute necessities. As [Ross] puts it, you don’t want to breathe in the smell of regret today, for your future self to reflect on a decade from now.

Work safe, work smart, don’t become the subject of a laser safety PSA.

Continue reading “Fire Extinguishers, Optical Density Ratings And Safely Using Home Lasers”

Engrave A Cylinder Without A Rotary Attachment? No Problem!

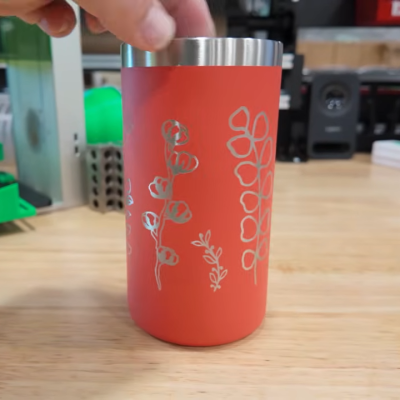
Laser-engraving a cylindrical object usually requires a rotary attachment, which is a motorized holder that rotates a cylindrical object in sync with the engraver. But [Samcraft] shows that engraving all around a mug can be done without a motorized rotary holder.

Separating a design into elements thin enough to engrave individually without losing focus is the key.

The basic idea is to split the design into a number of separate engraving jobs, each containing one element of the overall design, then setting the mug into a 3D printed jig and manually rotating it between jobs. To demonstrate, [Samcraft] selects a series of line-art flowers and plants which are ideal for this approach because there’s no need to minutely register the individual engravings with one another.

What about focus? [Samcraft] found that a design up to 45 mm wide could be engraved onto the curved surface of his mug before focus suffers too much. It’s true that this technique only works with certain types of designs — specifically those with individual elements that can be separated into tall and thin segments — but the results are pretty nice.

Laser engravers are a very serious potential eye hazard, and we are not delighted to see the way the shield around [Samcraft]’s engraver cannot close completely to accommodate the mug while the laser is active. But we’re going to assume [Samcraft] has appropriate precautions and eye protection in place off-camera, because laser radiation and eyeballs absolutely do not belong together, even indirectly.

Continue reading “Engrave A Cylinder Without A Rotary Attachment? No Problem!”

Front panel of Sony Blu-ray player

Blu-ray Won, But At What Cost?

Over on their substack [ObsoleteSony] has a new article: The Last Disc: How Blu-ray Won the War but Lost the Future.

In this article the author takes us through the history of Blu-ray media and how under Sony’s stewardship it successfully defeated the competing format of the time, HD DVD. Sony started behind the eight ball but through some deft maneuvering managed to come out on top. Perhaps the most significant contributing factor was the inclusion of Blu-ray drives in the PlayStation 3.

The person leading the Blu-ray initiative for Sony was Masanobu Yamamoto, whose legacy was the compact disc. What was needed was a personal media format which could deliver for high-definition 1080p video. As the DVD format did not have the storage capacity required, new formats needed to be developed. The enabling technology for both Blu-ray and HD DVD media was the blue laser as it allowed for more compact encoding.

Sony’s Blu-ray format became the dominating format for high-definition personal media…just as physical media died.

Thanks to [Stephen Walters] for writing in about this one.