Wearable Neon Necklaces Run On Battery Power

We typically think of neon signs as big commercial advertisements, hanging inside windows and lofted on tall signposts outside highway-adjacent businesses. [James Akers] has gone the other route with a fashionable build, creating little wearable neon necklaces that glow beautifully in just the same way.

Aiming for small scale, [James] began with 6 mm blue phosphor glass tube, which was formed to reference Pink Pony Club, one of Chappell Roan’s more popular songs. The glass was then filled with pure neon up to a relatively low pressure of just 8 torr. This was an intentional choice to create a more conductive lamp that would be easier to run off a battery supply. The use of pure neon also made the tubes easy to repair in the event they had a leak and needed a refill. A Midget Script gas tube power supply is used to drive the tiny tubes from DC power. In testing, the tubes draw just 0.78 amps at 11.8 volts. It’s not a light current draw, but for neon, it’s pretty good—and you could easily carry a battery pack to run it for an hour or three without issue.

If you’re not a glass blower, fear not—you can always make stuff that has a similar visual effect with some LEDs and creativity. Meanwhile, if you’ve got your own neon creations on the go—perhaps for Halloween?—don’t hesitate to light up the tipsline!

How To Design Custom LCDs For Your Own Projects

These days, you can buy full graphical LCD or OLED displays for just a few dollars. However, if you’re so inclined, you can actually get your own segmented LCDs made to suit your own projects. [Icoso Labs] explains how it’s done, with plenty of handy tips along the way.

There are three primary things you need to do to design a segmented LCD. First, you need to design it visually, laying out all the individual elements you want on the display. Then you need to determine how you want to split them up into segments. Some elements you’ll just want to be a single monolithic on-or-off shape, while other areas you might want to create things like seven-segment numerals for displaying numbers and so on. With that done, you also need to specify various engineering details—such as whether you want a transmissive, reflective, or transflective display, and thicknesses, colors, and other important things. Armed with all that, you can take your design to a manufacturer and get them to make a bunch for you. Often, there’s a moderately high tooling cost to start a run, but you can then turn out more examples of your design for just a few bucks apiece.

It’s a neat guide to designing something few of us have ever considered sourcing for ourselves. We’ve featured other insights into the world of segmented LCDs before, too. Video after the break.

Continue reading “How To Design Custom LCDs For Your Own Projects”

How Hydraulic Ram Pumps Push Water Uphill With No External Power Input

Imagine you have a natural stream running through a low-lying area on your farm. It’s a great source of fresh water, only you really need it to irrigate some crops sitting at a higher elevation. The area is quite remote from fixed utilities, complicating the problem.

Your first thought might be to grab a commercial off-the-shelf pump of some sort, along with a fancy solar power system to provide the necessary power to run it. But what if there were a type of pump that could do the job with no external power input at all? Enter the hydraulic ram pump.

Continue reading “How Hydraulic Ram Pumps Push Water Uphill With No External Power Input”

Electric Surfboard Gets Thrust Vectoring Upgrade

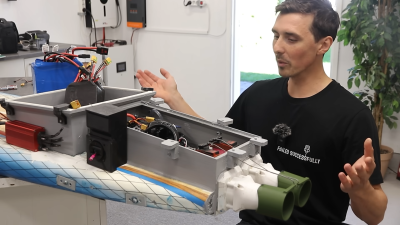
The internet has already taught us that an electric surfboard is a great way to get around on the water while looking like an absolute badass. [RCLifeOn] is continuing to push the boat forward in this regard, however, adding thrust vectoring technology to his already-impressive build.

If you’re unfamiliar with the world of electric surfboards, the concept is relatively simple. Stick one or more electric ducted fan thrusters on the back, add some speed controllers, and power everything from a chunky bank of lithium-ion batteries. Throw in a wireless hand controller, and you’ve got one heck of a personal watercraft.

Traditionally, these craft are steered simply by leaning and twisting as a surfer would with a traditional board. However, more dynamic control is possible if you add a way to aim the thrust coming from the propulsion system. [RCLifeOn] achieved this by adding steerable nozzles behind the ducted fan thrusters, controlled with big hobby servos to handle the forces involved. The result is a more controllable electric surfboard that can seriously carve through the turns. Plus, it’s now effectively an RC boat all on its own, as it no longer needs a rider on board to steer.

We’ve covered various developments in this surfboard’s history before, too. Video after the break. Continue reading “Electric Surfboard Gets Thrust Vectoring Upgrade”

Toy Train Joins The Internet Of Things

[Zoltan] was developing a workshop on Matter for DEF CON, and wanted to whip up a fun IoT project to go with it. His idea was simple—take a simple toy train, and put it on the Internet of Things.

Speed and low cost were the goals here, with a budget of around $40 and a timeline of one week. The train set sourced for the build was a 43 piece set with a locomotive, one carriage, and a simple oval track, retailing for $25. The toy train got a new brain in the form of an ESP32-C3 DevKitM-1, with the goal of commanding the device over Wi-Fi for ease of use. The microcontroller was set up to control the train’s brushed DC motor with an IRL540 MOSFET. A USB battery bank was initially employed to power the rig, which sat neatly on the train’s solitary carriage. This was later swapped out for a CR123A battery, which did the job for the train’s short duration in service.

Code for the project was simple enough. The ESP32 simply listens for commands via Matter protocol, and turns the train on and off as instructed. [Zoltan] demos the simple interoperability of the Matter protocol by switching the train on and off with Google Home voice commands, and it works perfectly well.

Toy trains aren’t something we typically see included in smart homes, but maybe they should be. If you’re cooking up your own oddball IoT hacks, be sure to let us know on the tipsline!

Creating Python GUIs With GIMP

GUI design can be a tedious job, requiring the use of specialist design tools and finding a suitable library that fits your use case. If you’re looking for a lightweight solution, though, you might consider just using a simple image editor with a nifty Python library that [Manish Kathuria] whipped up.

[Manish’s] intention was to create a better-looking user interface solution for Python apps that was also accessible. He’d previously considered other Python GUI options to be unimpressive, requiring a lot of code and delivering undesirable results. His solution enables the use of just about any graphic you can think of as a UI object, creating all kinds of visually-appealing possibilities. He also was eager to make sure his solution would work with irregular-shaped buttons, sliders, and other controls—a limitation popular libraries like Tkinter never quite got around.

The system simply works by using layered image files to create interactive interfaces, with a minimum of code required to define the parameters and performance of the interface. You’re not strictly limited to using the GIMP image editor, either; some of the examples use MS Paint instead. Files are on Github for those eager to try the library for themselves.

We’ve featured some neat GUI tools before, too, like this library for embedded environments. Video after the break.

Continue reading “Creating Python GUIs With GIMP”