[JohnAudioTech] noticed there was no bass on the TV at his parents’ house. That led to the discovery of a blown fuse and a corresponding repair. When he opened it up, he could smell that something had gone on in the amplifier. You can follow the repair in the video below.
His first theory was that some glue became conductive and shorted the power rails. We were skeptical, to be honest. When he fed power to it through a current limiter, he could hear a sizzling noise and even see a little glowing from the hot component.
Disassembly ensued. Removing the suspect components showed some seriously burned components and some charring under a switching transistor. The capacitors looked much worse for wear, and the PCB needed some wires to jumper burned conductors.
At the end, there was thumping, so it seems the surgery was a success. However, testing blew a fuse again, which made us nervous. Still, seems to work if you don’t drive it too hard.
We always enjoy watching a teardown, and if there’s a repair too, that’s even better.
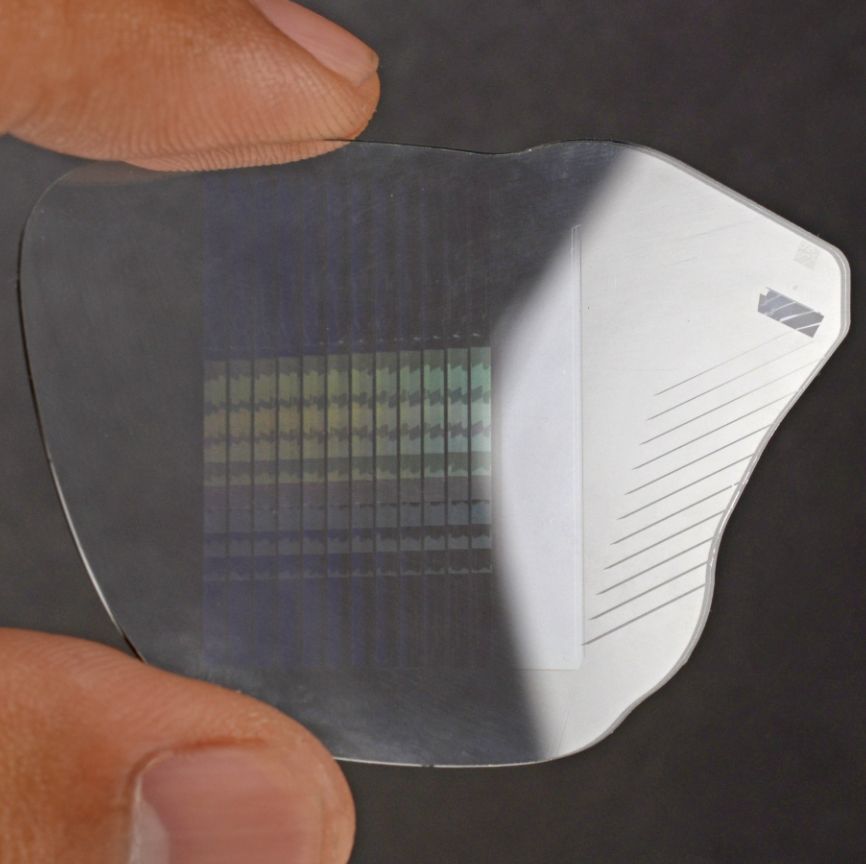
The geometric waveguide glass of the Meta Ray-Ban Display glasses. (Credit iFixit)
Recently the avid teardown folk over at iFixit got their paws on Meta’s Ray-Ban Display glasses, for a literal in-depth look at these smart glasses. Along the way they came across the fascinating geometric waveguide technology that makes the floating display feature work so well. There’s also an accompanying video of the entire teardown, for those who enjoy watching a metal box cutter get jammed into plastic.
Overall, these smart glasses can be considered to be somewhat repairable, as you can pry the arms open with a bit of heat. Inside you’ll find the 960 mWh battery and a handful of PCBs, but finding spare parts for anything beyond perhaps the battery will be a challenge. The front part of the glasses contain the antennae and the special lens on the right side that works with the liquid crystal on silicon (LCoS) projector to reflect the image back to your eye.
While LCoS has been used for many years already, including Google Glass, it’s the glass that provides the biggest technological advancement. Instead of the typical diffractive waveguide it uses a geometric reflective waveguide made by Schott, with the technology developed by Lumus for use in augmented reality (AR) applications. This is supposed to offer better optical efficiency, as well as less light leakage into or out of the waveguide.
Although definitely impressive technology, the overall repairability score of these smart glasses is pretty low, and you have to contest with both looking incredibly dorky and some people considering you to be a bit of a glasshole.
It takes quite a bit of effort to get a 0 out of 10 repairability score from iFixit, but in-ears like Apple’s AirPods are well on course for a clean streak there, with the AirPod Pro 3 making an abysmal showing in their vitriolic teardown video alongside their summary article. The conclusion is that while they are really well-engineered devices with a good feature set, the moment the battery wears out it is effectively e-waste. The inability to open them without causing at least some level of cosmetic damage is bad, and that’s before trying to glue the device back together. Never mind effecting any repairs beyond this.
Worse is that this glued-together nightmare continues with the charging case. Although you’d expect to be able to disassemble this case for a battery swap, it too is glued shut to the point where a non-destructive entry is basically impossible. As iFixit rightfully points out, there are plenty of examples of how to do it better, like the Fairbuds in-ears. We have seen other in-ears in the past that can have some maintenance performed without having to resort to violence, which makes Apple’s decisions here seem to be on purpose.
Although in the comments to the video there seem to be plenty of happy AirPod users for whom the expected 2-3 year lifespan is no objection, it’s clear that the AirPods are still getting zero love from the iFixit folk.
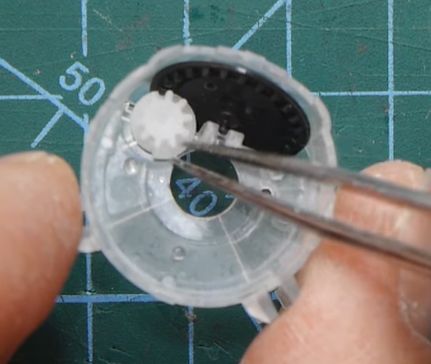
The counter wheel and white worm gear inside the counter. (Credit: Anthony Francis-Jones, YouTube)
Recently [Anthony Francis-Jones] decided to take a closer look at the inhaler that his son got prescribed for some mild breathing issues, specifically to teardown the mechanical counter on it. Commonly used with COPD conditions as well as asthma, these inhalers are designed to provide the person using it with an exact dose of medication that helps to relax the muscles of the airways. Considering the somewhat crucial nature of this in the case of extreme forms of COPD, the mechanical counter that existed on older versions of these inhalers is very helpful to know how many doses you have left.
Disassembling the inhaler is very easy, with the counter section easily extracted and further disassembled. The mechanism is both ingenious and simple, featuring the counter wheel that’s driven by a worm gear, itself engaged by a ratcheting mechanism that’s progressed every time the cylinder with the medication is pushed down against a metal spring.
After the counter wheel hits the 0 mark, a plastic tab prevents it from spinning any further, so that you know for certain that the medication has run out. In the video [Anthony] speculates that the newer, counter-less inhalers that they got with the latest prescription can perhaps be harvested for their medication cylinder to refill the old inhaler, followed by resetting the mechanical counter. Of course, this should absolutely not be taken as medical advice.
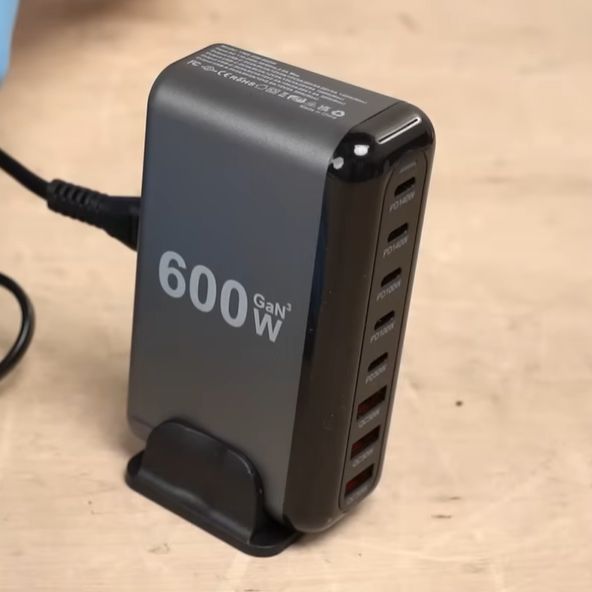
The 600W is not the output rating, despite all appearances. (Credit: Denki Otaku, YouTube)
We have seen many scam USB chargers appear over the years, with a number of them being enthusiastically ripped apart and analyzed by fairly tame electrical engineers. Often these are obvious scams with clear fire risks, massively overstated claims and/or electrocution hazards. This is where the “600W” multi-port USB charger from AliExpress that [Denki Otaku] looked at is so fascinating, as despite only outputting 170 Watt before cutting out, it’s technically not lying in its marketing and generally well-engineered.
The trick being that the “600W” is effectively just the model name, even if you could mistake it for the summed up output power as listed on the ports. The claimed GaN components are also there, with all three claimed parts counted and present in the main power conversion stages, along with the expected efficiency gains.
While testing USB-PD voltages and current on the USB-C ports, the supported USB-PD EPR wattage and voltages significantly reduce when you start using ports, indicating that they’re clearly being shared, but this is all listed on the product page.
The main PCB of the unit generates the 28 VDC that’s also the maximum voltage that the USB-C ports can output, with lower voltages generated as needed. On the PCB with the USB ports we find the step-down converters for this, as well as the USB-PD and other USB charging control chips. With only a limited number of these to go around, the controller will change the current per port dynamically as the load increases, as you would expect.
Considering that this particular charger can be bought for around $30, is up-front about the limitations and uses GaN, while a genuine 300 Watt charger from a brand like Anker goes for $140+, it leads one to question the expectations of the buyer more than anything. While not an outright scam like those outrageous $20 ‘2 TB’ SSDs, it does seem to prey on people who have little technical understanding of what crazy amounts of cash you’d have to spend for a genuine 600 Watt GaN multi-port USB charger, never mind how big such a unit would be.
Wireless earbuds are notoriously tiny. Want to see inside? [MCH170] did and published a Soundcore Space A40 Teardown.
In this teardown, you’ll see inside the charging case and one of the earbuds. Starting with the case, removing the back cover revealed the charging coil and a few screws holding the PCB in place. Removing the screws allows for removing the coil. The main PCB and the magnets that hold the earbuds in place are then visible. The microcontroller is an SS881Q from Sinhmicro. The back side of the main circuit board has a handful of SMD components, including some status LEDs. The battery is a 13450 with a nominal voltage of 3.72V and a capacity of 800mAh or 2.967Wh.
Bottom of the PCB with most of the ICs. (Credit: Brian Dipert, EDN)
People think about NiMH cell chargers probably as much as they think about batteries, unless it’s time to replace the cells in whatever device they’re installed in. This doesn’t make a teardown of one of these marvels any less interesting, especially when you can get an 8-bay charger with eight included NiMH cells for a cool $25 brand new. The charger even has USB ports on it, so it’s got to be good. Cue a full teardown by [Brian Dipert] over at EDN to see what lurks inside.
Of note is that [Brian] got the older version of EBL’s charger, which requires that two cells of the same type are installed side-by-side instead of featuring per-bay charging. This is a common feature of cheaper chargers, and perhaps unsurprisingly the charger was struggling with NiMH cells that other chargers would happily charge.
Opening up the unit required hunting for plastic clips, revealing the rather sparse internals. Unsurprisingly, there wasn’t a lot to look at, with the two USB ports apparently wired directly into the AC-to-DC section. There’s a CRE6536 AC-DC power management IC, the full-bridge rectifier and an unmarked 16-pin IC that presumably contains all of the charger logic. On the positive side, the mains-powered charger didn’t catch on fire (yet), but for anyone interested in leaving battery chargers unattended for extended periods of time, perhaps look at a more reputable brand.